Vacuum Bagging for Vacuum Infusion - P173
| Vacuum Bagging for Vacuum Infusion | |||||||
|---|---|---|---|---|---|---|---|
| Practice document | |||||||

| |||||||
| Document Type | Practice | ||||||
| Document Identifier | 173 | ||||||
| Themes | |||||||
| Tags | |||||||
| Objective functions |
| ||||||
| MSTE workflow | Development | ||||||
| Prerequisites | |||||||
Overview[edit | edit source]
This document provides a step-by-step guide, including the equipment needed for a typical vacuum bagging process. There are numerous online resources and videos available which also explain the vacuum bagging process. The purpose of this article is to provide a straight forward, generic how-to document for people with basic knowledge of composites, but minimal experience with vacuum bagging.
Introduction[edit | edit source]
Vacuum bagging can be used to consolidate a prepreg or typical wet layup part, removing trapped air and excess resin to create higher quality, more consistent parts. Vacuum bagging is also used in resin infusion processes. A number of common materials and steps are required for creating the vacuum bag for an infusion process. Most of the bagging steps are the same for both processes. This article will outline some of the differences as well as the differences in the processes themselves.
Significance[edit | edit source]
Vacuum bags help to consolidate the plies of composite material by removing air, promoting better adhesion and reducing voids as well as removing other volatiles in the resin. A vacuum bag applies even pressure, facilitating resin flow and uniform resin distribution, for a uniform final part. It helps remove excess resin, optimizing the resin-to-fiber ratio. Additionally, it creates a controlled environment, preventing moisture and contaminants from affecting the composite.
Practice[edit | edit source]
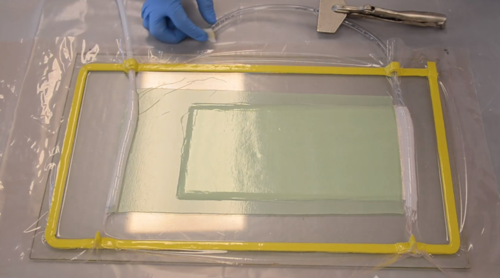
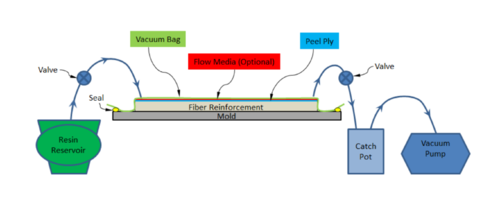
A step by step procedure on how to apply the vacuum bag for a simple infusion process. Refer to the schematic and example images below. Also see Vacuum assisted resin transfer moulding (VARTM)/resin infusion (VARI) for more detail and videos of the process.
- Lay non-porous release film on the tool surface. If the tool has been treated with mold release, you do not need to use this release film.
- Lay-up reinforcement onto mould tool to form a laminate. This is the deposition step, see Practice for Developing a Deposition Step
- Apply sealant tape around perimeter of the mould. Leave backing paper on until the vacuum bag is applied.
- Lay peel ply over laminate, covering the laminate fully and extending at least 2 cm past the perimeter of the laminate. As well as another 5 cm to where the vacuum will be pulled from.
- Add a layer of flow medium, either partly over your laminate, covering fully, or none at all. Use of and implementation strategy for flow medium depend on your laminate material and the resin used in the infusion process.
- Place spiral (cut) hoses, or other/preferred style of inlet tubing where the resin will enter the layup and at the last place resin will saturate, where vacuum will be drawn. Tape may be used to secure them in place.
- Connect hoses to be used for vacuum and resin input to the spiral hoses. Add a collar of sealant tape where the hoses will cross the sealant tape border.
- Cut vacuum bag to desired size
- Cut a large enough piece to allow it to conform to the part surface without bridging or stretching when vacuum is applied
- Lay vacuum bag over mould and sealant tape
- Starting at one point along the sealant tape, begin removing the backing tape, pressing the vacuum bag lightly onto the perimeter and pleat tape to allow re-positioning of the bagging material as needed
- Once vacuum bag position is satisfactory, press bagging securely onto tape over entire perimeter and pleats to complete the seal between the bag, tape and tool
- Connect the vacuum hose to a catch pot and close of the resin inlet hose.
- Connect the catch pot to the vacuum pump. Drawing a partial vacuum first will allow for adjusting of the vacuum bag so that there are no wrinkles over the part. Also adjust the spiral hoses to ensure they stay in position when full vacuum is drawn.
- Draw vacuum.
Conduct a Leak Test[edit | edit source]
A layup free of leaks is of utmost importance. If a leak is present then air is likely to be drawn into the laminate during resin flow and/or cure, resulting in porosity.
- Apply vacuum to the laminate
- Monitor the vacuum gauge and vacuum bag. Vacuum infusion processes are typically run at full vacuum (29.92 in-Hg) but less is acceptable depending on the application/process. If the desired level of vacuum is not achieved within a few minutes, the pump may not pull enough vacuum for the application, or there is a leak in the vacuum bag
- Leaks – Large leaks can usually be heard as a small whistling sound of escaping air. Inspect the sealant perimeter, pleats and other possible leak locations closely and listen for the sound of air. Smaller leaks may be harder to locate. Leaks typically occur at pleats or the vacuum port connection, in addition to the sealant perimeter. Ensure the sealant tape is firmly affixed to vacuum bag and mould surface in all locations.
- Once the desired level of vacuum is reached, typically 25-30 in-Hg, disconnect the pump and monitor the vacuum gage. Vacuum should not drop more than 2 in-Hg over 5 minutes.
Deciding Resin Feed and Vacuum Locations[edit | edit source]
Feed lines should be strategically placed to allow even resin flow through the part, ideally only reaching the vacuum port location(s) at the end of the infusion, once the part has been fully wet-out. It is typical to have multiple feed lines distributing resin to various starting points in the part. Vacuum port and resin feed location may require a few test trials be run to determine the ideal location, especially on large parts, or parts with complex geometry. Simulation may also be used. For more information see Vacuum assisted resin transfer moulding (VARTM)/resin infusion (VARI).
- Concentric Flow – When resin feed line is located around the perimeter of the part, the vacuum line is placed in the center and the resulting flow front is called concentric.
- Eccentric Flow – When a resin feed line is located in the center of the part, the vacuum line is placed on the perimeter of the part and the resulting flow front is called eccentric
Related pages
| Page type | Links |
|---|---|
| Introduction to Composites Articles | |
| Foundational Knowledge Articles | |
| Foundational Knowledge Method Documents | |
| Foundational Knowledge Worked Examples | |
| Systems Knowledge Articles | |
| Systems Knowledge Method Documents | |
| Systems Knowledge Worked Examples | |
| Systems Catalogue Articles | |
| Systems Catalogue Objects – Material | |
| Systems Catalogue Objects – Shape | |
| Systems Catalogue Objects – Tooling and consumables | |
| Systems Catalogue Objects – Equipment | |
| Practice Documents | |
| Case Studies | |
| Perspectives Articles |
| About | Help |
Welcome
Welcome to the CKN Knowledge in Practice Centre (KPC). The KPC is a resource for learning and applying scientific knowledge to the practice of composites manufacturing. As you navigate around the KPC, refer back to the information on this right-hand pane as a resource for understanding the intricacies of composites processing and why the KPC is laid out in the way that it is. The following video explains the KPC approach:
Understanding Composites Processing
The Knowledge in Practice Centre (KPC) is centered around a structured method of thinking about composite material manufacturing. From the top down, the heirarchy consists of:
- The factory
- Factory cells and/or the factory layout
- Process steps (embodied in the factory process flow) consisting of:
The way that the material, shape, tooling & consumables and equipment (abbreviated as MSTE) interact with each other during a process step is critical to the outcome of the manufacturing step, and ultimately critical to the quality of the finished part. The interactions between MSTE during a process step can be numerous and complex, but the Knowledge in Practice Centre aims to make you aware of these interactions, understand how one parameter affects another, and understand how to analyze the problem using a systems based approach. Using this approach, the factory can then be developed with a complete understanding and control of all interactions.
Interrelationship of Function, Shape, Material & Process
Design for manufacturing is critical to ensuring the producibility of a part. Trouble arises when it is considered too late or not at all in the design process. Conversely, process design (controlling the interactions between shape, material, tooling & consumables and equipment to achieve a desired outcome) must always consider the shape and material of the part. Ashby has developed and popularized the approach linking design (function) to the choice of material and shape, which influence the process selected and vice versa, as shown below:
Within the Knowledge in Practice Centre the same methodology is applied but the process is more fully defined by also explicitly calling out the equipment and tooling & consumables. Note that in common usage, a process which consists of many steps can be arbitrarily defined by just one step, e.g. "spray-up". Though convenient, this can be misleading.
Workflows
The KPC's Practice and Case Study volumes consist of three types of workflows:
- Development - Analyzing the interactions between MSTE in the process steps to make decisions on processing parameters and understanding how the process steps and factory cells fit within the factory.
- Troubleshooting - Guiding you to possible causes of processing issues affecting either cost, rate or quality and directing you to the most appropriate development workflow to improve the process
- Optimization - An expansion on the development workflows where a larger number of options are considered to achieve the best mixture of cost, rate & quality for your application.


