Using Barcol Hardness Measurements to Correlate Hardness and Degree of Cure - C103
| Using Barcol Hardness Measurements to Correlate Hardness and Degree of Cure | |
|---|---|
| Case study | |

| |
| Document Type | Case study |
| Document Identifier | 103 |
| Themes | |
| Tags | |
| Prerequisites | |
Summary[edit | edit source]
A manufacturer of bathtubs and other glass fibre products in the interior of British Columbia, Canada, approached the CKN with a desire to optimize their manufacturing process by establishing a method to perform in-situ degree of cure checks with a Barcol hardness impressor. This was in order to reduce the amount of delamination and splintering that can happen at the trimming step of their process, which occurs when the part is trimmed too early after material deposition, before the resin has reached a suitable degree of cure.
Their current manufacturing process is a spray up process with a polyester resin and chopped glass fibre. The deposition is rolled after spraying to consolidate the fibre an produce an even surface before being left at room temperature to cure. After the part is deemed to be suitably cured, it is taken off the mould and the edges are trimmed.
CKN performed DSC tests on neat resin and composite panels. They also made tests panels for the client to draw conclusions on which model of impressor is best suited and how it could be implemented in production. The impressors are not able to give a consistent reading, but are able to indicate when the cure has progressed enough for the part to be moved on to the next manufacturing step.
Challenge[edit | edit source]
The manufacturer needs an in-situ method to determine when the part is ready to be demoulded and trimmed without the part delaminating and splintering. There is no rapid and cost effective way to determine degree of cure in a production part, but there are some methods that test a property directly linked to the degree of cure. One of them being the hardness of the material.
Prerequisites[edit | edit source]
Also see "Resin Hardness Measurement (Barcol Impressor)" in How to measure curing time and degree of cure.
Approach[edit | edit source]
Differential Scanning Calorimetry[edit | edit source]
DSC tests were performed with the aim of determining the degree of cure that can be reached by holding the material at various temperatures. This proved to be difficult to do in practice as the initial curing reaction rate was very quick, such that the cure reaction had progressed significantly by the time the resin was in the DSC and cooled to below the Tg. To combat this, the resin and the catalyst were submerged in liquid nitrogen, then mixed as they were heating up once the viscosity was conducive to mixing. It was quickly distributed into DSC pans and either put into the freezer or into the DSC to start the run.
Another method employed was to dispense resin into the DSC pans, then submerge into liquid nitrogen. Then before the resin heats up, dispense catalyst into the pan and seal without mixing the two components. The DSC results from this method are questionable as there is no guarantee that the reaction occurred completely.
The DSC tests provided insight into the cure and how the curing reaction progressed at different temperatures. This became useful when using the impressors on the material and when also monitoring temperature during cure.
see Differential scanning calorimetry (DSC)
Barcol Hardness Impressor Models[edit | edit source]
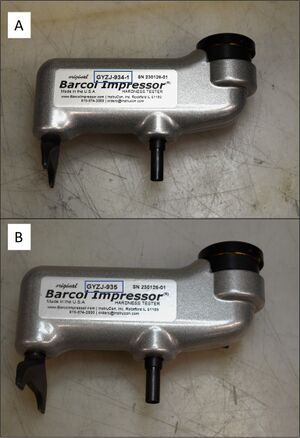
Two models of Barcol Hardness Impressor (GYZJ-934-1 and -935) were acquired. Model 934-1 is designed for hard plastics and soft metals such as aluminum and GFRP. The range is approximately 25 to 150 Brinell (10mm ball 500 kg load). The 935 model is designed for softer plastics and very soft metals. Since a correlation between very soft materials and different hardness measuring systems is challenging to uniformly establish, the documentation for the 935 model does not provide a conversion curve to other hardness systems. However, it is estimated that the 935 model measures 40 Brinell and lower. The impressors work by placing the needle and sleeve part of the impressor on a flat surface, ensuring the support is level with the needle. A reading is prompted by pressing firmly on the handle and reading off the value on the dial.
Thick and Thin Panel Fixtures[edit | edit source]
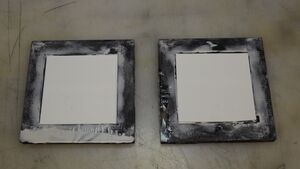
The bathtubs are produced by using a spray up onto an acrylic backing/gel coat, so the test panels were made by depositing the material onto 10x10 cm squares of the acrylic provided to CRN by the manufacturer. Their product line also follows two thicknesses of deposited material, so two fixtures were 3D printed so the acrylic plates could be placed inside. This allows the material to be deposited on top and when it sits flush with the frame, it is at the correct thickness. The two different panels are simply referred to as "thick" and "thin" in this case study.
Hardness Testing with Fibres[edit | edit source]
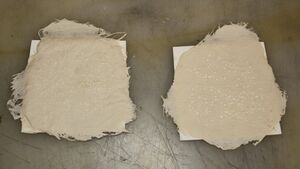
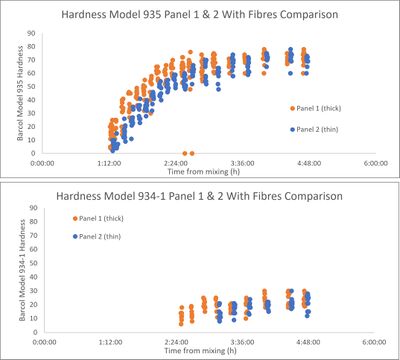
The first sets of tests were done with resin and 5% volume fraction of fibres. The time of mixing the resin and the catalyst was recorded and the mix of resin and fibres were spread over the acrylic plates and evened out to the correct thickness. The resin was left to gel at room temperature then hardness measurements were taken at regular intervals for a total of five hours. Even though the gel time of the resin is around 10-20 minutes at room temperature, the hardness impressors did not start giving readings until 70 minutes for the 935 model and 145 minutes for the 934-1 model. This highlights that although the resin might feel hard and fully cured to the touch, it may still be far from suitably cured.
From these tests we learned that the 935 model is much more appropriate for this application as the impressor started giving readings earlier in the curing process and the spread of readings is narrower. However, the spread of readings is also relatively high for the 935 model, suggesting that the uneven surface of the panel is affecting the readings. It is also evident that the thick panel cures faster than the thin panel, most likely due to the extra heat that is generated during curing.
Hardness Testing Without Fibres and Monitoring Temperature[edit | edit source]
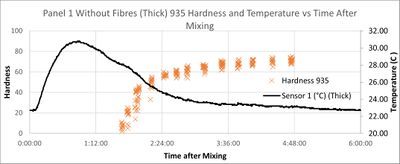
The next set of tests were conducted with thermocouples embedded into the resin and no fibre. This test provided valuable insight into the exothermic reaction and how that correlated to the hardness and progression of cure. The test also showed that there is still a considerable spread in the hardness readings in the initial stages of recording hardness. However, when the readings begin to plateau, the spread is less than when fibre is included in the deposition. The exothermic peak seen by the thermocouple also matches the shape of the exotherm readings in the isothermal DSC tests. This test also reconfirmed that the thick panels cure faster than the thin panels.
Outcomes[edit | edit source]
The cure of the polyester resin is deceptively slow when comparing to the gelation time of 15-20 minutes. The exothermic peak occurs at around 60 minutes, but the hardness readings do not begin until around 100 minutes, and the full cure is at around 240 minutes. The resin feels cured to the touch after 30 minutes, so the need for a qualitative method to determine cure progression on the shop floor is clearly needed. The issue with the Barcol hardness measurement method is that the readings are very varied depending on surface evenness, this is influenced by the fibres and the shape of the part. However, there is a certain hardness and degree of cure where the impressor will start to give readings and the average of the readings follows an upwards trend.
The Barcol hardness model 935 has been implemented into the process by using it as a check for minimum cure, where the criteria is: if the impressor gives a reading, the cure has progressed far enough to move to the next step.
Future Steps[edit | edit source]
To further optimize this process on the shop floor there are two paths that can be taken. Firstly, a study to determine the optimal degree of cure that a part can be trimmed at. This can then be related back to the Barcol hardness readings to provide a range of readings where the part is acceptable for demould. The second path will be to use temperature monitoring by thermal camera or thermocouple. This will monitor the relative temperature and exothermic reaction observed, to then determine how far along the cure has progressed, further determining when to demould the part.
Return to Case Studies
Related pages[edit | edit source]
- Practice for developing a thermal transformation process step
- Curing of thermosetting polymers
- Degree of cure
| About | Help |
Welcome
Welcome to the CKN Knowledge in Practice Centre (KPC). The KPC is a resource for learning and applying scientific knowledge to the practice of composites manufacturing. As you navigate around the KPC, refer back to the information on this right-hand pane as a resource for understanding the intricacies of composites processing and why the KPC is laid out in the way that it is. The following video explains the KPC approach:
Understanding Composites Processing
The Knowledge in Practice Centre (KPC) is centered around a structured method of thinking about composite material manufacturing. From the top down, the heirarchy consists of:
- The factory
- Factory cells and/or the factory layout
- Process steps (embodied in the factory process flow) consisting of:
The way that the material, shape, tooling & consumables and equipment (abbreviated as MSTE) interact with each other during a process step is critical to the outcome of the manufacturing step, and ultimately critical to the quality of the finished part. The interactions between MSTE during a process step can be numerous and complex, but the Knowledge in Practice Centre aims to make you aware of these interactions, understand how one parameter affects another, and understand how to analyze the problem using a systems based approach. Using this approach, the factory can then be developed with a complete understanding and control of all interactions.
Interrelationship of Function, Shape, Material & Process
Design for manufacturing is critical to ensuring the producibility of a part. Trouble arises when it is considered too late or not at all in the design process. Conversely, process design (controlling the interactions between shape, material, tooling & consumables and equipment to achieve a desired outcome) must always consider the shape and material of the part. Ashby has developed and popularized the approach linking design (function) to the choice of material and shape, which influence the process selected and vice versa, as shown below:
Within the Knowledge in Practice Centre the same methodology is applied but the process is more fully defined by also explicitly calling out the equipment and tooling & consumables. Note that in common usage, a process which consists of many steps can be arbitrarily defined by just one step, e.g. "spray-up". Though convenient, this can be misleading.
Workflows
The KPC's Practice and Case Study volumes consist of three types of workflows:
- Development - Analyzing the interactions between MSTE in the process steps to make decisions on processing parameters and understanding how the process steps and factory cells fit within the factory.
- Troubleshooting - Guiding you to possible causes of processing issues affecting either cost, rate or quality and directing you to the most appropriate development workflow to improve the process
- Optimization - An expansion on the development workflows where a larger number of options are considered to achieve the best mixture of cost, rate & quality for your application.
To use this website, you must agree to our Terms and Conditions and Privacy Policy.
By clicking "I Accept" below, you confirm that you have read, understood, and accepted our Terms and Conditions and Privacy Policy.

